
1.在微信小程序上,實現多圖片的上傳在wxml文件中實現頁面布局。
<view style="width:100%;float:left;margin-top:25rpx;margin-left:40rpx;padding-bottom:120rpx;" class="weui-uploader__bd">        <view class="weui-uploader__files">
              <block wx:for="{{pics}}" wx:for-item="image" wx:key="item">
               <view class="weui-uploader__file">
                 <image src="../../../images/warehouse/scanCode_delete.png" wx:if="{{image!=''}}"
                 bindtap="img_delete" class="image_view_css" data-index="{{index}}"
                 data-sign="{{disabl}}"></image>
                 <image class="weui-uploader__img" wx:if="{{image!=''}}" src="{{filters.updateImag(httpURL,deURL,image)}}" bindtap="previewImage"></image>
               </view>
              </block>
            </view>
            <view class="weui-uploader__input-box {{isShow?'true':'hideTrue'}}">              <view class="weui-uploader__input" bindtap="chooseImage" data-sign="{{disabl}}"></view>
            </view>
</view>
2.這里頁面樣式的布局實現。
.weui-uploader__bd {
  margin-bottom: -4px;
  margin-right: -9px;
  overflow: hidden;
}
.weui-uploader__file {  float: left;
  margin-right: 15px;
  margin-bottom: 9px;
}
.image_view_css{  width:60rpx;
  height: 60rpx;
  position: absolute;
  z-index: 5;
  margin-left: 65px;
  margin-top: -25rpx
}
.weui-uploader__img {  display: block;
  width: 79px;
  height: 79px;
}
.weui-uploader__input-box {  float: left;
  position: relative;
  margin-right: 9px;
  margin-bottom: 9px;
  width: 77px;
  height: 77px;
  border: 1px solid #d9d9d9;
}
.weui-uploader__input-box:before, .weui-uploader__input-box:after {  content: " ";
  position: absolute;
  top: 50%;
  left: 50%;
  transform: translate(-50%, -50%);
  background-color: #d9d9d9;
}
.weui-uploader__input-box:before {  width: 2px;
  height: 39.5px;
}
.weui-uploader__input-box:after {  width: 39.5px;
  height: 2px;
}
.weui-uploader__input {  position: absolute;
  z-index: 1;
  top: 0;
  left: 0;
  width: 100%;
  height: 100%;
  opacity: 0;
}
.hideTrue {  display: none
}
3.在js層的實現中在在data變量中先定義好
pics: [],
count: [1, 2,
3],
isShow:true,
變量
1)onload的方法中首先要加載
isShow: (options.isShow == "true" ? true : false)
2)頁面布局形成的為:
3)在實現圖片的選擇上傳中點擊空白的頁面增加圖片調用執行方法
在
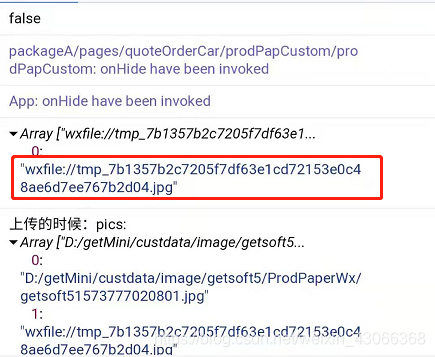
圖片的上傳后success成功返回值中在開發工具上是以http://開頭返回圖片文路徑,手機上返回的是wxfile:// 開頭的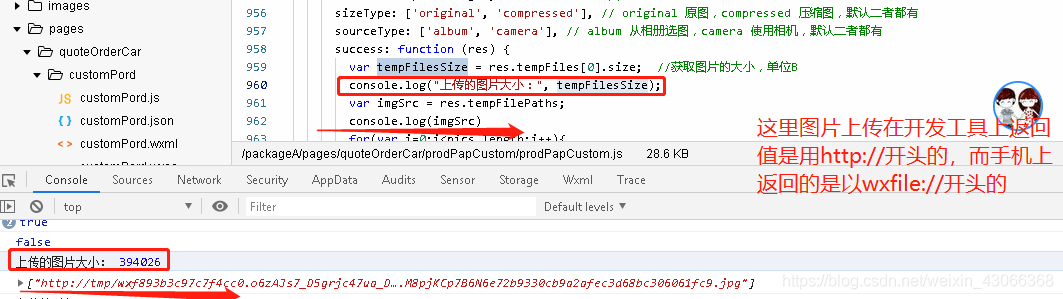
4)而實現圖片的預覽調用的方法是:
  previewImage: function (e) {    var current = e.target.dataset.src
    wx.previewImage({      current: current,      urls: this.data.pics
    })
  },
實現將圖片上傳到后臺的服務器上,在js中調用的方法
//對保存了圖片數組pics做一個for循環。
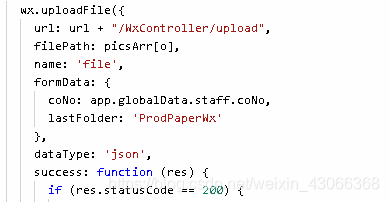
 wx.uploadFile({              url: url + "/WxController/upload",              filePath: pics[0], //這里微信的調用方法只能每次上傳一張圖片所以可以再調用方法前做對數組pics的一個迭代循環。
              name: 'file',              formData: {                coNo: app.globalData.staff.coNo,                lastFolder: 'ProdPaperWx'
              },              dataType: 'json',              success: function (res) {                if (res.statusCode == 200) {					console.log("成功返回值:",res)
				}
			  }
}) 
后臺接口方法/WxController/upload 用java執行
 public Map<String,Object> upload(HttpServletRequest request, @RequestParam(value = "file", required = false) MultipartFile file) throws IOException {        Map<String,Object> map=new HashMap<String, Object>();        String msg="",ret="success",path="",type=null;
        request.setCharacterEncoding("UTF-8");        String coNo=request.getParameter("coNo");        String lastFolder =request.getParameter("lastFolder");        if(!file.isEmpty()){            String fileName = file.getOriginalFilename();
            type = fileName.indexOf(".") != -1 ? fileName.substring(fileName.lastIndexOf(".") + 1, fileName.length()) : null;            if(type!=null){                if("PNG".equals(type.toUpperCase())||"JPG".equals(type.toUpperCase())) {                    // 項目在容器中實際發布運行的根路徑
                 String realPath=BaseController.getCustFilePath()+"image/"+coNo+ "/" + lastFolder + "/";            //這圖片存放的路徑采用了在指定的方式,在BaseController的getCustFilePath()方法中指定好了
                 File myFilePath = new File(realPath);              if (!myFilePath.exists()){//文件夾不存在,生成一個文件夾
               myFilePath.mkdirs();
              }                    // 自定義的文件名稱
                    String trueFileName=coNo+String.valueOf(System.currentTimeMillis())+"."+type;                    // 設置存放圖片文件的路徑
                    path=realPath+trueFileName;
                    file.transferTo(new File(path));ret="success";msg="";
                }else {
                 msg="不是我們想要的文件類型,請按要求重新上傳!";ret="error";path="";
                }
            }else{
                msg="文件類型為空!";ret="error";path="";
            }
        }else {
            msg="沒有找到相對應的文件!";ret="error";path="";
        }
        map.put("ret",ret);
        map.put("msg",msg);
        map.put("path",path);        return map;
    }
這里是BaseController類內的一個指定圖片存放路徑的方法。
public class BaseController {	//客戶文件存放路徑
		public static String getCustFilePath(){			return "D:/lqb/imge/";
			}
}